[version 13][version 12][version 11][version 10][version 9][version 8][version 7][version 6]
5.3 Mesh generation with the blockMesh utility
This section describes the mesh generation utility, blockMesh, supplied with OpenFOAM. The blockMesh utility creates parametric meshes with grading and curved edges.
The mesh is generated from a dictionary file named blockMeshDict located in the system (or constant/polyMesh) directory of a case. blockMesh reads this dictionary, generates the mesh and writes out the mesh data to points and faces, cells and boundary files in the same directory.
The principle behind blockMesh is to decompose the domain geometry into a set of 1 or more three dimensional, hexahedral blocks. Edges of the blocks can be straight lines, arcs or splines. The mesh is ostensibly specified as a number of cells in each direction of the block, sufficient information for blockMesh to generate the mesh data.
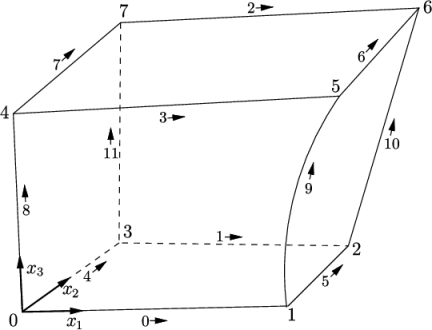
Each block of the geometry is defined by 8 vertices, one at each corner of a hexahedron. The vertices are written in a list so that each vertex can be accessed using its label, remembering that OpenFOAM always uses the C++ convention that the first element of the list has label ‘0’. An example block is shown in Figure 5.4 with each vertex numbered according to the list. The edge connecting vertices 1 and 5 is curved to remind the reader that curved edges can be specified in blockMesh.
It is possible to generate blocks with less than 8 vertices by collapsing one or more pairs of vertices on top of each other, as described in section 5.3.5 .
Each block has a local coordinate system
 that must be right-handed. A right-handed
set of axes is defined such that to an observer looking down the
 axis, with
  nearest them, the arc from a point on the
  axis to a point on
the
  axis is in a clockwise sense.
The local coordinate system is defined by the order in which the vertices are presented in the block definition according to:
- the axis origin is the first entry in the block definition, vertex 0 in our example;
- the
 direction is described by moving from
vertex 0 to vertex 1;
 - the
 direction is described by moving from
vertex 1 to vertex 2;
 - vertices 0, 1, 2, 3 define the plane
 ;
; - vertex 4 is found by moving from vertex 0 in
the
 direction;
 - vertices 5,6 and 7 are similarly found by
moving in the
 direction from vertices 1,2 and 3 respectively.
| Keyword |
Description |
Example/selection |
||||
|
|
|
|
||||
| convertToMeters |
Scaling factor for the vertex coordinates |
0.001 scales to mm |
||||
| vertices |
List of vertex coordinates |
(0 0 0) |
||||
| edges |
arc 1 4 (0.939 0.342 -0.5) |
|||||
| block |
Ordered list of vertex labels and mesh size |
|
||||
| patches |
List of patches |
|
||||
| mergePatchPairs |
List of patches to be merged |
see section 5.3.2 |
||||
|
|
|
|
||||
5.3.1 Writing a blockMeshDict file
The blockMeshDict file is a dictionary using keywords described below.
- convertToMeters: scaling factor for the vertex coordinates, e.g. 0.001 scales to mm.
- vertices: list of vertex coordinates, see section 5.3.1.1 .
- edges: used to describe curved geometry, see section 5.3.1.2 .
- block: ordered list of vertex labels and mesh size, see section 5.3.1.3 .
- boundary: sub-dictionary of boundary patches, see section 5.3.1.5 .
- mergePatchPairs: list of patches to be merged, see section 5.3.2 .
The convertToMeters keyword specifies a scaling factor by which all vertex coordinates in the mesh description are multiplied. For example,
convertToMeters 0.001;
 .
.
5.3.1.1 The vertices
The vertices of the blocks of the mesh are given next as a standard list named vertices, e.g. for our example block in Figure 5.4 , the vertices are:
vertices
(
( 0 0 0 ) // vertex number 0
( 1 0 0.1) // vertex number 1
( 1.1 1 0.1) // vertex number 2
( 0 1 0.1) // vertex number 3
(-0.1 -0.1 1 ) // vertex number 4
( 1.3 0 1.2) // vertex number 5
( 1.4 1.1 1.3) // vertex number 6
( 0 1 1.1) // vertex number 7
);
5.3.1.2 The edges
Each edge joining 2 vertex points is assumed to be straight by default. However any edge may be specified to be curved by entries in a list named edges. The list is optional; if the geometry contains no curved edges, it may be omitted.
Each entry for a curved edge begins with a keyword specifying the type of curve from those listed below.
- arc: a circular arc with a single interpolation point or angle + axis (see below).
- spline: spline curve using a list of interpolation points
- polyLine: a set of lines with list of interpolation points
- BSpline: a B-spline curve with list of interpolation points
- line: a straight line, the default which requires no edge specification.
The keyword is then followed by the labels of the
2 vertices that the edge connects. Following that, interpolation
points must be specified through which the edge passes. For an
arc, either of the following is
required: a single interpolation point, which the circular arc will
intersect; or an angle and rotation axis for the arc. For
spline, polyLine and BSpline, a list of interpolation points is
required. For our example block in Figure 5.4 we specify an
arc edge connecting vertices 1
and 5 as follows through the interpolation point  :
:
edges
(
arc 1 5 (1.1 0.0 0.5)
);
edges
(
arc 1 5 25 (0 1 0) // 25 degrees, y-normal
);
5.3.1.3 The blocks
The block definitions are contained in a list named blocks. Each block definition is a compound entry consisting of a list of vertex labels whose order is described in section 5.3 , a vector giving the number of cells required in each direction, the type and list of cell expansion ratio in each direction.
Then the blocks are defined as follows:
blocks
(
hex (0 1 2 3 4 5 6 7) // vertex numbers
(10 10 10) // numbers of cells in each direction
simpleGrading (1 2 3) // cell expansion ratios
);
The second entry gives the number of cells in
each of the 
 and
and  directions for that block. The third entry gives
the cell expansion ratios for each
direction in the block. The expansion ratio enables the mesh to be
graded, or refined, in specified directions.
The ratio is that of the width of the end cell
  along one edge of a
block to the width of the start cell
  along that edge, as
shown in Figure 5.5
.
Each of the following keywords specify one of two types of grading specification available in blockMesh.
- simpleGrading: The simple option specifies uniform expansions
in the local
 ,
,  and
and  directions respectively with only 3 expansion ratios,
e.g.
simpleGrading (1 2 3) - edgeGrading: The full cell expansion description gives a
ratio for each edge of the block, numbered according to the scheme
shown in Figure 5.4
with the arrows representing the
direction from first cell…to last cell e.g.
edgeGrading (1 1 1 1 2 2 2 2 3 3 3 3)
This means the ratio of cell widths along edges 0-3 is 1, along edges 4-7 is 2 and along 8-11 is 3 and is directly equivalent to the simpleGrading example given above.
5.3.1.4 Multi-grading of a block
Using a single expansion ratio to describe mesh grading permits only “one-way” grading within a mesh block. In some cases, it reduces complexity and effort to be able to control grading within separate divisions of a single block, rather than have to define several blocks with one grading per block. For example, to mesh a channel with two opposing walls and grade the mesh towards the walls requires three regions: two with grading to the wall with one in the middle without grading.
OpenFOAM v2.4+ includes multi-grading functionality that can divide a block in an given direction and apply different grading within each division. This multi-grading is specified by replacing any single value expansion ratio in the grading specification of the block, e.g. “1”, “2”, “3” in
blocks
(
hex (0 1 2 3 4 5 6 7) (100 300 100)
simpleGrading (1 2 3);
);
We will present multi-grading for the following example:
- split the block into 3 divisions in the
 -direction, representing 20%, 60% and 20% of the block
length;
 - include 30% of the total cells in the y-direction (300) in each divisions 1 and 3 and the remaining 40% in division 2;
- apply 1:4 expansion in divisions 1 and 3, and zero expansion in division 2.
We can specify this by replacing the
 -direction expansion ratio “2” in the example above with the
following:
blocks
(
hex (0 1 2 3 4 5 6 7) (100 300 100)
simpleGrading
(
1 // x-direction expansion ratio
(
(0.2 0.3 4) // 20% y-dir, 30% cells, expansion = 4
(0.6 0.4 1) // 60% y-dir, 40% cells, expansion = 1
(0.2 0.3 0.25) // 20% y-dir, 30% cells, expansion = 0.25 (1/4)
)
3 // z-direction expansion ratio
)
);
Both the fraction of the block and the fraction of the cells are normalized automatically. They can be specified as percentages, fractions, absolute lengths, etc. and do not need to sum to 100, 1, etc. The example above can be specified using percentages, e.g.
blocks
(
hex (0 1 2 3 4 5 6 7) (100 300 100)
simpleGrading
(
1
(
(20 30 4) // 20%, 30%...
(60 40 1)
(20 30 0.25)
)
3
)
);
5.3.1.5 The boundary
The boundary of the mesh is given in a list named boundary. The boundary is broken into patches (regions), where each patch in the list has its name as the keyword, which is the choice of the user, although we recommend something that conveniently identifies the patch, e.g.inlet; the name is used as an identifier for setting boundary conditions in the field data files. The patch information is then contained in sub-dictionary with:
- type: the patch type, either a generic patch on which some boundary conditions are applied or a particular geometric condition, as listed in section 5.2.1 ;
- faces: a list of block faces that make up the patch and whose name is the choice of the user, although we recommend something that conveniently identifies the patch, e.g.inlet; the name is used as an identifier for setting boundary conditions in the field data files.
blockMesh collects faces from any boundary patch that is omitted from the boundary list and assigns them to a default patch named defaultFaces of type empty. This means that for a 2 dimensional geometry, the user has the option to omit block faces lying in the 2D plane, knowing that they will be collected into an empty patch as required.
Returning to the example block in Figure 5.4 , if it has an inlet on the left face, an output on the right face and the four other faces are walls then the patches could be defined as follows:
boundary // keyword
(
inlet // patch name
{
type patch; // patch type for patch 0
faces
(
(0 4 7 3) // block face in this patch
);
} // end of 0th patch definition
outlet // patch name
{
type patch; // patch type for patch 1
faces
(
(1 2 6 5)
);
}
walls
{
type wall;
faces
(
(0 1 5 4)
(0 3 2 1)
(3 7 6 2)
(4 5 6 7)
);
}
);
When specifying a cyclic patch in blockMesh, the user must specify the name of the related cyclic patch through the neighbourPatch keyword. For example, a pair of cyclic patches might be specified as follows:
left
{
type cyclic;
neighbourPatch right;
faces ((0 4 7 3));
}
right
{
type cyclic;
neighbourPatch left;
faces ((1 5 6 2));
}
5.3.2 Multiple blocks
A mesh can be created using more than 1 block. In such circumstances, the mesh is created as described in the preceeding text. The only additional issue is the connection between blocks. Firstly, if a face of one block also belongs to another block, the block face will not form an external patch but instead a set of internal faces of the cells in the resulting mesh.
Alternatively if the user wishes to combine block faces which do not exactly match one another, i.e. through shared vertices, they can first include the block faces within the patches list. Each pair of patches whose faces are to be merged can then be included in an optional list named mergePatchPairs. The format of mergePatchPairs is:
mergePatchPairs
(
( <masterPatch> <slavePatch> ) // merge patch pair 0
( <masterPatch> <slavePatch> ) // merge patch pair 1
…
)
- the faces of the master patch remain as originally defined, with all vertices in their original location;
- the faces of the slave patch are projected onto the master patch where there is some separation between slave and master patch;
- the location of any vertex of a slave face might be adjusted by blockMesh to eliminate any face edge that is shorter than a minimum tolerance;
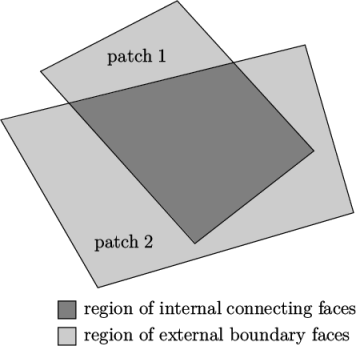
- if patches overlap as shown in Figure 5.6 , each face that does not merge remains as an external face of the original patch, on which boundary conditions must then be applied;
- if all the faces of a patch are merged, then the patch itself will contain no faces and is removed.
The consequence is that the original geometry of the slave patch will not necessarily be completely preserved during merging. Therefore in a case, say, where a cylindrical block is being connected to a larger block, it would be wise to the assign the master patch to the cylinder, so that its cylindrical shape is correctly preserved. There are some additional recommendations to ensure successful merge procedures:
- in 2 dimensional geometries, the size of the cells in the third dimension, i.e. out of the 2D plane, should be similar to the width/height of cells in the 2D plane;
- it is inadvisable to merge a patch twice, i.e. include it twice in mergePatchPairs;
- where a patch to be merged shares a common edge with another patch to be merged, both should be declared as a master patch.
5.3.3 Projection of vertices, edges and faces
blockMesh can be configured to create body fitted meshes using projection of vertices, edges and/or faces onto specified geometry. The functionality can be used to mesh spherical and cylindrical geometries such as pipes and vessels conveniently. The user can specify within the blockMeshDict file within an optional geometry dictionary with the same format as used in the snappyHexMeshDict file. For example to specify a cylinder using the built in geometric type the user could configure with the following:
The user can then project vertices, edges and/or faces onto the cylinder surface with the project keyword using example syntax shown below:
(
project (-1 -0.1 -1) (cylinder)
project ( 1 -0.1 -1) (cylinder)
...
);
edges
(
project 0 1 (cylinder)
...
);
faces
(
project (0 4 7 3) cylinder
...
);
The use of this functionality is demonstrated in tutorials which can be located by searching for the project keyword in all the blockMeshDict files by:
find $FOAM_TUTORIALS -name blockMeshDict | xargs grep -l project
5.3.4 Naming vertices, edges, faces and blocks
Vertices, edges, faces and blocks can be named in the configuration of a blockMeshDict file, which can make it easier to manage more complex examples. It is done simply using the name keyword. The following syntax shows naming using the example for projection in the previous subsection:
(
name v0 project (-1 -0.1 -1) (cylinder)
name v1 project ( 1 -0.1 -1) (cylinder)
...
);
edges
(
project v0 v1 (cylinder)
...
);
When a name is provided for a given entity, it can be used to replace the index. In the example about, rather than specify the edge using vertex indices 0 and 1, the names v0 and v1 are used.
5.3.5 Creating blocks with fewer than 8 vertices
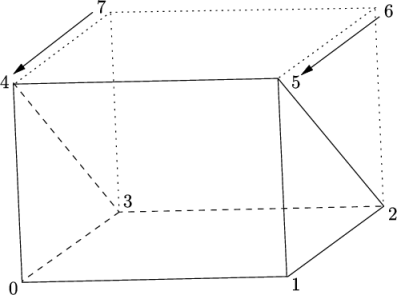
It is possible to collapse one or more pair(s) of vertices onto each other in order to create a block with fewer than 8 vertices. The most common example of collapsing vertices is when creating a 6-sided wedge shaped block for 2-dimensional axi-symmetric cases that use the wedge patch type described in section 5.2.2 . The process is best illustrated by using a simplified version of our example block shown in Figure 5.7 . Let us say we wished to create a wedge shaped block by collapsing vertex 7 onto 4 and 6 onto 5. This is simply done by exchanging the vertex number 7 by 4 and 6 by 5 respectively so that the block numbering would become:
hex (0 1 2 3 4 5 5 4)
The same applies to the patches with the main consideration that the block face containing the collapsed vertices, previously (4 5 6 7) now becomes (4 5 5 4). This is a block face of zero area which creates a patch with no faces in the polyMesh, as the user can see in a boundary file for such a case. The patch should be specified as empty in the blockMeshDict and the boundary condition for any fields should consequently be empty also.
5.3.6 Running blockMesh
As described in section 3.3 , the following can be executed at the command line to run blockMesh for a case in the <case> directory:
blockMesh -case <case>


